Thursday, August 20, 2015

Getting it done!

I really hate living in chaos, and after our move a little over a year ago I feel like we have never gotten ourselves out of it.  Our oldest started school this year though and I am getting sucked down into the abyss of a messy home.  So here's the deal:  I am going to have to buckle down and make a real effort to organize one space during nap time each weekend.  I know I won't do it after work during the week.

We are nowhere near this bad but still!
via
A girl can dream right?
via

The kitchen cabinets!  The day we moved was filled with closings on both our old house and our new, as well as the last minute packing at our old house and then the unloading at our new house so that the truck could be returned.  And  then on top of that our daughter ended up having emergency surgery that night.  She was fine but it complicated our unpacking efforts.  My wonderful in-laws very graciously unpacked our kitchen for us so that we could eat that weekend, but a few things weren't quite where I would have put them.  And then we have two base cabinets with large blind spots that have become dumping grounds,  Something has to be done with those in particular!  And we also have some spaces filled with utensils and things that our children have outgrown.  The kitchen will be organized before we have been in the house 2 years, maybe we will even get some paint on the orangey wood cabinets!

And the before isn't as bad as ours!
via

The linen closet.  We moved all kinds of stuff from the old house that we haven't even touched since we have been in the new house.  And it is mainly stuffed in the linen closet.  Along with the blow up bed our guests use and the potty seat that both kids have outgrown (gross huh?).  We also have duplicates of some things because we weren't consistent with where we unloaded things (we have light bulbs in both the linen closet and the laundry room.)

Don't we all aspire to this?
via

The master bedroom closet.  Again, another out of site, out of mind kind of place.  It is a good size space but poorly utilized.  I hope to change out the closet system at some point but we may need to at least clean out the space before we even go that far!
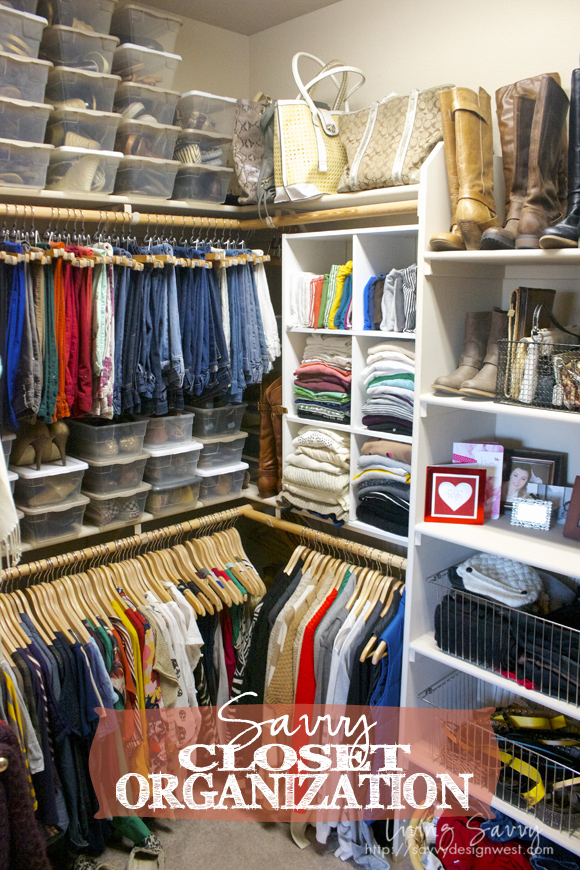
This state may not be reached til after a new closet system but . . .
via

Those spaces will be a start and hopefully putting this in writing will make me feel more accountable to actually get stuff done.

Monday, August 17, 2015

Let there be Light

Our old home, typical of its era, had tons and tons of windows.  This was done a lot in the south prior to the advent of central heat and air to provide ventilation during the hot summers.  It also helped let in a lot of wonderful light.  I didn't realize how much this light affected me and my happiness until we moved into our 1990's era rancher.  Most of the rooms have one window.  That does not provide for a naturally well lit home.


Last fall we painted our foyer a color we had tested on the walls and loved in the space.  It was a lavender and looked great in the space with our artwork.  Then winter came and we began getting even less light in our north facing front rooms.  And the small arched window in the front door let no light in.  And then I hated the grayed out purple in the foyer.  I had almost convinced myself to repaint until we could afford to buy a new 12 light front door.

via

But then as I was trolling Craig's List one day, probably looking for a new sink for the laundry room we want to make over, I came across a listing for a cross buck door.  The picture reminded me of a country farmhouse which is somewhat appropriate for our kind of rural, suburban landscape.  I showed it to the hubby who liked it too but I am bad with pulling the trigger on CL purchases.  The next day I decided that we did need the door and called about it.  It was still available so we went that afternoon to get it.


The lady who sold it to us had taken it out of a home she was rehabbing.  We got to have a look around her house which was super cool since we haven't done any demo and rehab work like that in a few years.  I think I love the smell of lead paint dust!  (Kind of a joke, but a house that is stripped down to bead board and lath really does something to me!)


Getting the door home was an adventure that involved it hanging out the rear end of my compact SUV and bungee cords holding the door down.  I feel bad for all the people who were stuck behind me since I was scared that driving too fast would pull the door up and open.  But we did get it home and now I can't wait to get it painted and hung so that this winter our foyer is a nice, bright space!

via

Thursday, August 13, 2015

First impressions

When we first moved into our old house we had no walkway to the front porch and door and the front stoop was a concrete and brick half round with 3 steps.  They were rather steep and the top step in particular was very small.  It also wasn't in keeping with the style of the house in my opinion.  Some people loved it and felt it added some grandeur to the house.  Mind you, this was a 1350 square foot, 1930's era bungalow, it was not ever meant to be grand!


As you looked at the house from the street, the left side had been a later addition, and the foundation had never been bricked in.  Instead it was closed off with some white plastic lattice that drove my mom crazy!  In the fall of 2012 we finally decided to make the front of the house a little more cohesive and hired a mason to brick in the foundation and build us a new stairway.

This was the only picture of the porch I could find from that phase, I know it's not great, please excuse it.

After they were done we tiled the steps and the floor of the front porch with slate tile that had originally been intended for our kitchen makeover.  We removed aluminum siding that covered some of the original beadboard ceiling and painted it blue (we are in the south, thank you very much), and added a hanging lantern that made better use of the high ceiling than the standard porch fixture that had been there before.  The original railings were not even securely fastened to the posts so we replaced those with some that I felt fit the character of the home better.


We put a glider and coffee table out there, along with some additional chairs and a rolling cart which the UPS man particularly loved and after that spent plenty of time porching while watching our oldest run around the front yard.  It worked particularly well for us because our lot was triangular with a huge front yard and small rear.  A lot of play time was logged in that front yard and having a comfortable and inviting place to sit was integral to our quality, family time.


Monday, August 3, 2015

Catch ya on the flip side - Urban charm

Once, when I was small and riding through the downtown area looking at all the dilapidated buildings, I told my mom that when I grew up I wanted to buy the run down houses, fix them up, and sell them to poor people.  My mom told me that was already done by a group called Habitat for Humanity.  When I got older and found out more about Habitat I realized that wasn't entirely true but also learned how expensive rehab can be compared to new construction.

Despite this knowledge, that initial career plan still holds a lot of intrigue for me.  I still love to look at real estate listings and dream about the changes I would make to the property.  Of course, this urge isn't helped by all the property flipping and renovation shows HGTV has currently.

With that being said I thought it would be fun and also potentially satiating to chronicle some properties that I come across and the changes that I would make to them here.

First up is a property that is in a somewhat transitional neighborhood.  The area around it has recently gotten some nice retail and restaurant space, the only Whole Foods in our area is within a mile or so of this property.  It is on the smaller side with 978 square feet but we are in an area that has a lot of higher educational facilities making this the perfect starter home for a young couple seeking an urban lifestyle.

{all photos courtesy of Zillow}

The first thing I would do is clean up the front landscaping and add a privacy fence to the rear.  Possibly add some new windows, spray foam insulation, and a tankless water heater for energy efficiency.

Then, in the only bathroom, I would add some drama in the form of a boldly patterned floor, but in black and white to reference the time period of the original house.  Some subway tile in the bath and beadboard wainscoting for the walls, a pedestal sink and some sconces to round things out, get you a nice clean space.


The kitchen would get some herringbone slate floors, white shaker style cabinets, concrete countertops with an apron style sink, an industrial style faucet, stainless steel range hood, some schoolhouse lighting, and a pop of color via some bright penny tile.  Add in some white appliances and you have a great juxtaposition of modern and period.


The rest of the house would get a fresh coat of a soft grayed white and refinished hardwood floors.  And there you have the perfect urban cocoon.


Thursday, July 23, 2015

What a girl wants

A friend of mine has a daughter who starts high school next month.  In preparation for that she wants to change her bedroom into a sleeker, more modern space.  They recently moved her into the bonus room so some walls are low with sloped ceilings but that helps add some character to the room.


The style of her furniture was more traditional and little girl than she wanted and they are upgrading her to a full size bed.  The room has good bones with new wood floors and built-ins along the side walls.


She needed her new room to continue to provide the current level of storage and she needed a new desk area to keep her focused and on track with her studies as she enters high school.  She had found some bedding that she liked and she is very into the clean, modern lines of Ikea (her mom is into the price point!) so we put together this design board.
Image sources:
       Nightstands: Ikea malm via iheartorganizing.blogspot.com
       Bedding: Kala bedding via bedbathntable.com.au
       Butterfly chair: bedbathandbeyond.com
       Chest with tv components: Ikea malm via ellenclare.com
       Desk chairs: ikea.com
       Desk/dressing table: Ikea malm dressing table via couture-girl.co.uk
       Floating shelves: Ikea lack shelves via banana84cj.wordpress.com


Even if they don't go with this design I can't wait to see what her room looks like when they are done!

Thursday, July 16, 2015

The most expensive dishwasher EVER! Part 2

It is really hard to renovate a kitchen while pregnant!  Cravings for cheesy casseroles are impossible to satisfy when you are cooking only on a grill.  We found our we were pregnant with our first child right before we started this project.  The news was another major catalyst for the project.  We figured a dishwasher and indoors laundry were somewhat non-negotiable for us with a newborn.


Going into the renovation we knew we wanted slate tile floors, butcher block counters, a beaded board backsplash, and white cabinets.  When all was said and done we ended up with wood floors, granite counters, a tile backsplash, and white cabinets.


Once the contractor had ripped everything out we discovered the original wood floors under the old vinyl and opted to refinish those.  We opted for granite because it seemed like that was what everyone was using and might add the most value should we choose to move one day.  The backsplash tile ended up being something we replicated on the fireplace in the living room.


We had a door from the living room to the kitchen which we closed up during renovation to create some symmetry in the living room and so we could add built-ins on either side of the fireplace.  That change left us with a long wall perfect for a desk and file storage purposes.


We also added a huge walk in pantry that was perfect for storing everything from the vacuum to extra food to tons of serving pieces that we owned.  We also used it to house the microwave that we used infrequently.


And we brought our washer and dryer in from the detached garage and stuck them under a granite folding counter.  That was a huge change, I cannot even imagine walking through the rain to wash burp clothes and dirty onesies.


And then we had a baby and our dinner parties, one of the driving forces behind this renovation, dried up like California.  But we had our dishwasher, albeit an extremely costly one.

Wednesday, July 8, 2015

The most expensive dishwasher EVER - Part 1

When we moved into our first home there was no dishwasher.  I had grown up in a home without a dishwasher and so did not see this as a problem.  We would add one when we could afford to.  As time went by we began cooking far more often as well as having people over for meals on a regular basis.  This became kind of problematic but mainly the morning after when all the dishes were staring at us from the sink.  For our kitchen "redo" I anticipated painting the cabinets, tiling the floor, and installing some butcher block countertops.  And installing the dishwasher. 


I thought we would be able to cut out a section of the cabinets for this, but a coworker of mine was of the opinion that that wasn't going to work.  Then we had a contractor come look at it and we found out that we were at maximum capacity on our electrical power.  The system was not going to be able to sustain the additional power a dishwasher would require.  At this point we began to realize our dishwasher was going to be very expensive.


Since we were learning it was going to be expensive we decided to go ahead and go all out.  A dropped ceiling had been installed at one point so we decided to remove that.  I hated the soffits that were above the cabinets so we decided to remove those.  This was pre-Pinterest of course so all my ideas were in magazines.  I had some blogs that I read and got some ideas from those but really just wanted a kitchen that fit with the age and style of our home.  The original kitchen had been remodeled in the early 1960's which we discovered when we removed the water heater from its space in the corner of the cabinetry above.  It was a 1964 water heater that we were just beginning to have problems with in spring of 2010.


I loved coming home the first day after the old paneling had been torn out.  We could see where old windows had been before the house had been added onto.  And the backside of our chimney had been covered where the original stove had tied in to vent.  The dust drove my husband crazy though!  He swept and mopped a path from the back door to the hall to our bedroom and over to the hall to the living room.  But staying on the path was no fun, I couldn't see all the details from there.  He was constantly fussing that I wouldn't "stay on the path".  


I drew out a sketch of what I hoped the kitchen would ultimately look like.  It was my first time doing anything like that and wasn't done to scale nor did I know how to fully convey dimensions.  But it gave me and the hubby a general idea of the look I was going for.  I wanted a beaded board backsplash and butcher block counters.  We were going to do slate tiles on the floor.  I really just wanted it to look old fashioned and not put us in bankruptcy.  When we bought the house I planned to use a home equity loan to do the improvements but of course, not long after we bought, the market tanked.  We were underwater by the time we were ready to do improvements and so there was no equity to tap.  It was going to have to be cash all the way.  And the cost of the mechanics was adding up.  

Since we had gutted the space we also figured out a way to bring our washer and dryer indoors from the detached garage.  We added a walk in pantry as extra storage.  And when we couldn't figure out where to put a water heater we decided to invest in a tankless gas water heater.  That was the best decision we ever made!  There was no running out of hot water with that.  It is probably what I miss most about that house.


Planning the kitchen was so much fun even though the details changed many times before we were done.  But, renovations are like Lays potato chips, you can't do just one.  I'll be back to show the after photos.